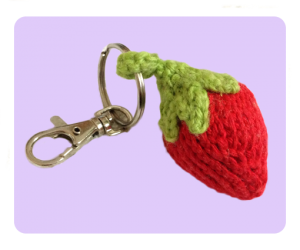
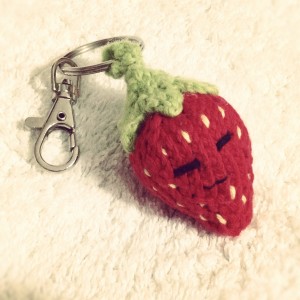
So, recently I’ve gotten addicted to knitting cute toys that have daily uses as well as being cute. This is why I’ve turned this free strawberry knitting patterns into a keychain. I’ve done few different versions of the strawberry finishes — with and without the face, with and without the yellow seeds. Which do you prefer? Leave your comments below!
I like how the size of the knitted strawberry is similar to a life sized one. As for the knitting patterns, I have put it down as intermediate instead of easy. This is because the stem is a little tricky! But don’t worry, I will include a video tutorial on how to knit the stem so you will have no trouble knitting them.
For the keyring, I’ve purchased mine from eBay. Must say I am very happy with the quality of the items for the price. For 12x Lobster Clasps and matching Split Rings, it only cost
$2.99 AUD $3.79 AUD (includes free shipping too!). The items are shipped from China, so it may take a while but it’s worth the wait.
Difficulty Level:
![]()
Skills Required:
CO: Cast On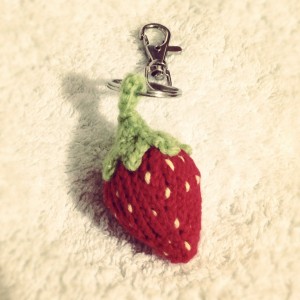
K: Knit
P: Purl
M1: Make 1 stitch
K2tog: Knit 2 stitches as 1 together
Kfb: Knit front then back
DPN: Double Pointed Needles (ability to knit in the round)
BO: Bind Off
Finished Size: 8.3cm tall (without keychain) x 4cm diameter at largest point (Please note that this size is made with the needles & yarn specified below, different yarns and needles size will produce different results)
Needles: US 3 – 3.25 mm (sets of 4 or 5 DPNs)
Body — Panda Cotton Blend 8ply in 18 Bright Red (dye lot #11621)
Green Stem — Lincraft Superwash 8ply in 3005 (dye lot #774749)
Gauge:
Not important as it doesn’t need to fit. *Tips* Select slightly smaller needles for the recommend size yarn so stuffing doesn’t show through.
Facial Features (optional):
scraps of black thread for eyes and mouth, scraps of yellow thread for cheek and seeds & scraps of green thread to attach body and stem together
Other Materials:
Tapestry needle
Sewing needle
Lobster Clasp with matching split ring (this is the exact item I bought from eBay)
Free Cute Strawberry Keychain / Keyring knitting patterns:
Body:
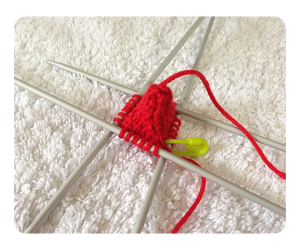
Starting from the bottom, with DPN and Red, CO 4 sts. I evenly divided the sts to 4 DPN (1sts each). But you are more than welcomed to divide it to 3 DPN 1-2-1 sts each DPN. Being careful not to twist.
Round 1: Join, Kfb x 4 times (8 sts total)
Round 2: K. Place a stitch marker after your first stitch
Round 3: K2, M1, K4, M1, K2 (10 sts total)
Round 4: K
Round 5: *K3, M1, K2, M1* x 2 times (14 sts total)
Round 6: K
Round 7: *K4, M1, K3, M1* x 2 times (18 sts total)
Round 8: *K5, M1, K4, M1* x 2 times (22 sts total)
Round 9: K
Round 10: *K11, M1* x 2 times (24 sts total)
Round 11: *K6, M1* x 4 times (28 sts total)
Round 12: K
Round 13: *K7, M1* x 4 times (32 sts total)
Round 14: K
Round 15: *K6, K2tog* x 4 times (28 sts total)
Round 16: *K5, K2tog* x 4 times (24 sts total)
Round 17: *K4, K2tog* x 4 times (20 sts total)
Round 18: *K3, K2tog* x 4 times (16 sts total)
Round 19: *K2, K2tog* x 4 times (12 sts total)
Cut yarn. thread through each remaining loop with tapestry needle. If you are embroidering the face, don’t close up the body yet. Do all embroidery now (face & seeds). Stuffed the body with fillings of your choice. Once finished, pull yarn tight to close up the hole and secure.
Green Stem:
Starting from the top, with DPN and Green, CO 4 sts. Leave approx. 80cm tail as you will need it for making up the keychain loop later. Being careful not to twist.
Round 1: K
Round 2: Kfb x 4 times (8 sts total)
Round 3: K
Round 4: *K2, M1* x 4 times (12 sts total)
Round 5: K
Round 6; *K2, M1* x 6 times (18 sts total)
Shaping the leaves:
You will now work on each leaves one by one. You now should have 18 sts total in your needles. For every 3 sts you are going to make 1 leaf. (6 leaves total)
Step 1: K3, turn your needle around
Step 2: P3, turn your needle around
Step 3: K1, K2tog, turn your needle around
Step 4: P2, turn your needle around
Step 5: K2tog
Now you will notice you have reached the peak of your leaf. All is well, except the working yarn is too far separated from your next live stitch. What you want to do next is to pick up 4 stitches on the left edge of your leaf so you can slowly bring that working yarn down next to your live stitch.
Once you finished picking up 4 stitches on the edge and bringing that working yarn down, you want to join that stitch to the first remaining stitch. To do this, you slip the next stitch purlwise, then you pass the stitch that you have bring down earlier to this slipped stitch. Yay, you have just knitted the first leaf!
To do all the next leaves, the steps are exactly the same except for Step 1.
Consequent leaves: 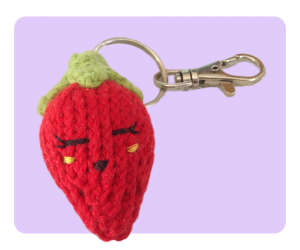
Step 1: K2, turn your needle around
Step 2-5: same as above.
Repeat above process until you have total of 6 leaves. Then, cut yarn and seam.
Keychain loop:
To make the keychain loop, you want to CO 10 with the long cast on tail earlier.
BO
Use tapestry needle to create a loop and secure the remaining yarn together.
Attach stem to the top of body with green thread. Use a thread instead of yarn as you want the join to be invisible when finished. Insert the split ring to the loop and you are done!
Video Tutorials on Shaping the leaves and creating the keychain loop
6/12/12: video tutorials added
Remember, if you do make the strawberry keychain, I would love it if you can share them with me by either sending me the photos via email for a chance to be published in the blog / tag me on Facebook / upload them in my Ravelry 

Pingback: The Best Back to School Knit & Crochet Patterns Collection - The Knochet Niche
Hi! I love the pattern but I’m new to using double pointed needles and increasing. I made the strawberry and the only problem is the increases are noticeable. Are they supposed to be like that? Do you have any tips or tricks for increasing so it doesn’t show as much? Thank you. Now ill try to make the stem!
Hi Ariana, Sorry for the late reply.. I’ve been busy with other things. Try use smaller needle for the recommended yarn size and the increase won’t be as noticeable 🙂 Generally when making toys I use smaller needles so the end product looks more compact and structured. When I make the strawberry the increase is barely noticeable. Hope this helps..!
Pingback: Happy Valentine Free Desktop Wallpaper
Pingback: Happy Valentine Free Desktop Wallpaper | Free Cute Knitting Patterns | How to Knit Tutorials
Pingback: Video Tutorials: How to Knit Short Rows & Make Loop for Strawberry Keychain - Free Cute Knitting Patterns | How to Knit Tutorials | Free Cute Knitting Patterns | How to Knit Tutorials
Pingback: Video Tutorials: How to Knit iCord for Handbag Wrist Strap - Free Cute Knitting Patterns | How to Knit Tutorials | Free Cute Knitting Patterns | How to Knit Tutorials
Pingback: Free Frog Coin Purse Knitting Patterns, Video Tutorials included! | Free Cute Knitting Patterns | How to Knit Tutorials
I love the keychain. Do you have others?I have a few toy patterns I could let you have as well.
Hi Pat, Thank you for your comments! I don’t have other keychain pattern right now (this strawberry is the first one I designed) I am happy that you like it, I will be sure to design more keychains in the future 🙂 If you are looking for toys, I have some more (they are in the “Free Knitting Patterns” menu link). If you have some patterns you want to share I would love them, thank you!